The following SAP CO tutorial guide you ‘how to assign company code to the controlling area in SAP’ with step-by-step guide and importance of this configuration in SAP.
- This assignment enables the integration between the company code and the controlling area in the SAP system.
- Assigning company code to a controlling area is an important organization structural for financial accounting and controlling modules in SAP.
- Through this assignment, it connects the controlling components to the financial accounting in SAP.
Prerequisites to assign company code to the controlling area in SAP
You can Assign Company Code to Controlling Area in SAP Controlling by using the following navigation method
- Transaction code: OX19
- SAP IMG Path: – SPRO >> Implementation Guide for R/3 Customizing (IMG) >> Controlling >> Organization >> Maintain Controlling area.
How to Assign Company Code to Controlling Area in SAP
Step 1: Execute transaction code “OX19” in the SAP command field or follow the SAP IMG path controlling – Organization and execute IMG activity “Maintain Controlling Area”
Step 2: It displays with activities of
- Copy, Delete, Check Controlling Area
- Maintain Controlling Area
- Delete SAP Delivery Data
For assigning company code to the controlling area, choose “Maintain controlling area” by double clicking on it
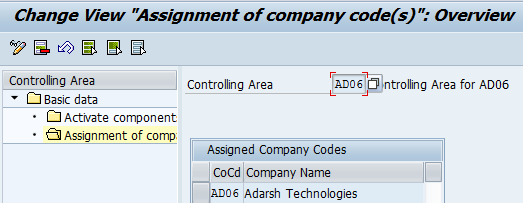
Step 3: Select the controlling area key AD06 and double click on Assignment of company codes in the left-hand corner.
Step 4: On the Change View “Assignment of company codes” overview screen, click on new entries for the assignment of company codes.
On New entries of Assignment of company codes to controlling area screen, update the company codes that you want to assign to this controlling area and press enter to continue.
Step 5: Click on the save icon to save the configured assignment data.
Successfully you have assigned the Company Code to Controlling Area in SAP.


