How to Create Recruitment Instruments in SAP
The following SAP training tutorials guides you how to create recruitment instruments in SAP step by step. First recruitment instruments are created and they are classified according to the media used.
Step 1: – You can create recruitment instruments in SAP HR by using the following navigation method.
- Transaction code: – SPRO.
- SAP IMG Path: – SPRO >> IMG (F5) >> Personnel Management >> Recruitment >> Workforce requirement and advertisement >> Create recruitment instruments.
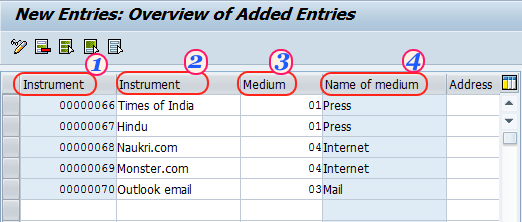
Step 2: – On the overview screen, click on new entries to maintain new recruitment instrument as per your business requirements. The following recruitment instruments are creating in SAP.
| Instrument | Instrument | Medium | Name of medium |
| 00000066 | Times of India | 1 | Press |
| 00000067 | Hindu | 1 | Press |
| 00000068 | Naukri.com | 4 | Internet |
| 00000069 | Monster.com | 4 | Internet |
| 00000070 | Outlook email | 3 |
Step 3: – On the new entries screen, update the following fields.
- Instrument: – Enter a unique id that identifies the recruitment instrument in SAP.
- Instrument: – update the descriptive name of the instrument.
- Medium: – Update the medium key that the instruments are classified according to the medium used.
- Name of medium: – Name of the medium will automatically updates after your press enter key.

Click on save button (Ctrl+s) to save the configured recruitment instrument data in SAP.
Create addresses for recruitment instruments
Lets learn how to create address for recruitment instrument in SAP, go back to img path and click on create address for recruitment instrument.
Path: – SPRO >> IMG (F5) >> Personnel Management >> Recruitment >> Workforce requirement and advertisement >> Create addresses recruitment instrument
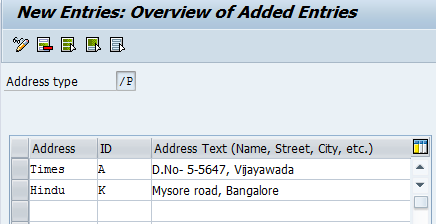
Step 1: – On the overview screen, click on new entries.

Step 2: – Update the Address, ID, Address fields and click on save button to save the data.

Now go back to IMG path and click on Create recruitment instrument, update the address fields to instruments.

Click on save button to save the changed data.