Create Status profile in SAP
The following training tutorials guide you on how to create a status profile in SAP step by step. In our previous SAP training tutorials, we have discussed how to create coding mask in SAP.
Access the status profile screen by using one of the following navigation methods.
- SAP IMG Path: – SPRO -> IMG (F5) -> Project system -> Structures -> Operative structures -> Work breakdown structure -> WBS user status -> Create status profile
- Transaction code: – OK02
Step 1: – Enter transaction code “OK02” in the SAP command field and enter.

Step 2: – On change status profile overview screen, click on create button to create new status profile.

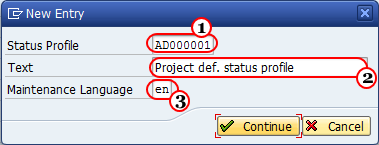
Step 3: – A pop of window opens for new entries. Update the following fields.
- Status profile: – Update the new status profile ID that identifies the profile in SAP.
- Text: – Update the descriptive text of the profile.
- Maintenance Language: – Enter the language key, here we updated “EN”(International English)
- After maintaining all the details press enter to continue.

Step 4: – On the next screen, double click on status profile that you have created in previous screen.

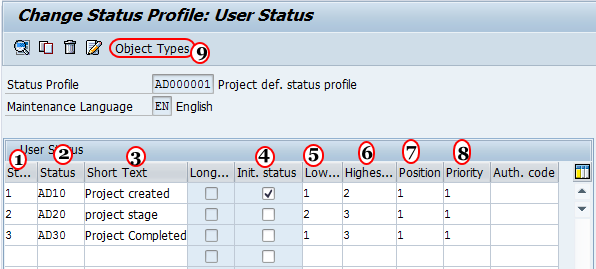
Step 5: – In next screen, update the following details.
- Stat: – Enter the status number from lowest to highest.
- Status: – Update the unique status ID
- Short text: – Update the descriptive text of the status
- Initial status: – Select this option to set the status of a profile for the project is created.
- Lowest: – Update the lowest status number.
- Highest: – Update the highest status number.
- Position: – Update the position that determines the status should be displayed
- Priority: – Update the priority status to be displayed.
- After maintain all the details, click on object types.

Step 6: – In next screen, maintain the object types allowable for your project.

After maintaining all the status profile details click on save button to save the configured data in SAP.