How to Create Lockbox Posting data in SAP
The following SAP training tutorials guide you on how to define lockbox posting data in SAP step by step. In our previous training tutorials, we have learned how to define lockboxes for house banks in SAP.
- SAP IMG Path: – SPRO > IMG > Financial Accounting > Bank accounting > Business transactions > Payment transactions > Lockbox > Define posting data
- Transaction code: – OBAX
Step 1: – Enter transaction code “OBAX” in the SAP command field and enter.

Step 2: – On the posting data overview screen, click on the “new entries” button to create new lockbox posting data as per organization requirements.

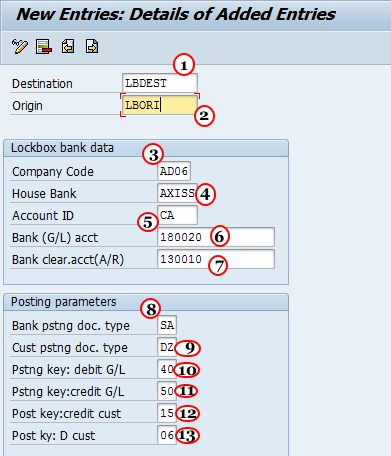
Step 3: – On the lockbox posting data configuration screen, update the following fields.
- Destination: – Update the destination code that the bank submitted in your lockbox file.
- Origin: – Update the lockbox account number.
- Company code: – Update the company code that the lockbox account belongs.
- House bank: – Update the house bank id.
- Account ID: – Update the account id that you have created, after updating the account id automatically company code and house bank gets updated.
- Bank G/L account number: – Update the bank G/L account, it is mandatory to update the cash deposit G/l account.
- Bank clearing account: – Update the clearing G/L account of the lockbox posting.
- Bank posting document type: –Update the document type that posting debits the deposit account and credits the bank clearing account.
- Customer posting document type: – Update the customer document type that credits the customer and debits the bank clearing account.
- Posting key: debit G/L: – Update the posting key that debits the G/L account when transactions are done in a lockbox.
- Posting key: credit G/L: – Update the posting key that credits the G/L account when transactions are done in a lockbox
- Post key: credit customer: – Update the posting key that credits the customer account.
- Post key: debit customer: – Update the posting key that debits the customer account in lockbox transactions.

After maintaining the details click on the save button to save the configured lockbox posting data.