Create project profile in SAP
In this SAP tutorial, you will learn how to maintain a project profile in SAP step by step. In our previous SAP training tutorials, we have discussed how to define coding mask, create status profile and define selection profile.
You create a project profile by using one of the following SAP navigation method.
- SAP IMG Path: – SPRO -> IMG (F5) -> Project system -> Structures -> Operative structures -> Work breakdown structure -> Create project profile.
- Transaction code: – OPSA.
Step 1: – Enter transaction code “OPSA” in the SAP command field and press enter to continue.
Step 2: – On the project profile overview screen, click on new entries to maintain new project profile as per organizations project requirements.

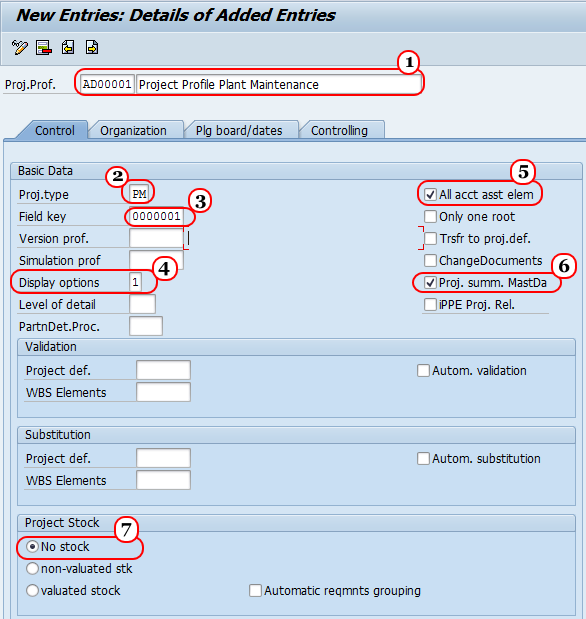
Step 3: – On the New entries screen, update the following fields.
Control
- Proj.prof. (Project profile) : – Enter the unique ID that identifies the project profile in SAP and update the descriptive text of the project profile.
- Project type: – It determines in which category the project belongs.
- Field key: – Update the field key from the drop-down list, different project profiles can have different field keys.
- Display options: – It determines how the project will be identified in the project builder. Possible entries are (1- Identification using project number, 2- Identification using short description, and 3- Identification using text).
- All account assessment elements: – Select this field if all the WBS are to be created through this profile.
- Project summarizes master data: – Select this field to summarize the project master data through characteristics, if you have not selected this field you are not able to perform any reports.
- Project stock: – Project stock is default with no stock option.

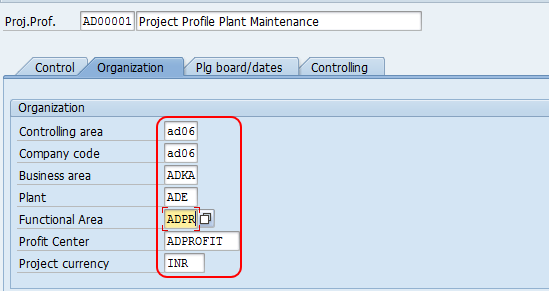
Step 4: – Click on the organization tab and update the following fields.
- Controlling area: – Update the controlling area that the project profit profile belongs.
- Company code: – Update the company code that controls the area belongs to
- Business area: – Update the business area that belongs to the company code and controlling area
- Plant: – Update the plant code that belongs to the company code
- Functional area: – Enter the functional area key.
- Profit center: – Update the profit center that belongs to the controlling area.
- Project currency: – Update the currency of the project.

Click on the save button and save the configured data.